Thursday, November 28, 2013

Crochet Art?? Yey!!

I made a Google search for crochet art today and I wasn't disappointed!! :0...These people are so in love with crochet and so so much better than me that I can't wait to be like them!! Oh these wonderful pictures and creations and magnificent imaginations and creative expressions!... My eyes was just so full of 'em and my heart just burst with excitement when I saw these pictures....Here...take your share.... (♥♥,)..Oh by the way, just click the links of the pictures to know more about each one of them...OK....

image from:: craftstylish.com


image from:: http://www.xaxor.com


image from:: mysticmedusa.com

image from:: weaveandwonder.com


image from:: ganoksin.com

image from:: streetartutopia.com

image from:: craftstylish.com


image from:: bumpstop.com

image from:: deviantart.com


image from:: mamamia.com.au


image from:: arttherapyblog.com


image from:: www.kingsoleil.com

image from:: highstreetculture.com

My journey to the crochet world is getting exciting every moment...There are always new things to learn and discover. If you think that crochet is just for clothing and fashion, you're wrong. From these pictures I learned that crocheting plus artistry plus purpose can lead to a grand and unique masterpiece that can contribute to the history of arts, society, and awareness to social or environmental issues. Some of the pieces here are made up of recycled materials, some are made by real artists that has great passion for this type of art works. For me they are great inspiration and my love for this new found passion grew in my heart. I can't wait to make my own masterpiece!

♥♥♥♥♥


Saturday, November 23, 2013

TBP::Test Beginner's Project

I have already made 5 projects since I learned how to crochet. 3 are finished, the other 2 are halfway. I called these projects Test Beginner's Projects since they are my very first projects as I'm learning my way in the crochet world. On this post I will try to show each one and the stitches and skills I've learned throughout the time I spent working on them. (Note: I'm sorry if the images are blurred, I only used my phone in taking them.)

TBP1:: Headband
On this project I learned how to make a crochet button and how to apply increasing and decreasing stitches (other refer to this as adding and dropping crochet stitches). I also learned how to combine a basic stitch and a type of stitch I found from the Lion Brand website, the Crochet Cable Stitch. The cable stitch was a challenge for me, but when I finally got it, it became a breeze. I was also overwhelmed when I finally learned how to drop crochet stitches. And also imagine my thrill when I finished my crochet button....Oh, I was so happy indeed... ≧^◡^≦... So here they are....

crochet button

the body of the headband, end not yet weaved

at the other end of the body i put a loop to insert the crochet button

button ready to be sewed on the other end of the body

button sewed and hooked and ends weaved

showing the back part of the headband against the wrong side

another pose for the headband... :)

final pose for the finished headband...

TBP2::Pillow Case
On this project I learned how to create granny squares and how to join them. I was so excited about this project. When I first learned how to crochet, the very first question that came to my mind was "how do they make those squares and join them?"  I was saved by this site and the author has a tutorial on joining squares. There are different ways on how to join them but the way that appealed to me the most is the joining squares as you go. This technique is challenging and unique and I like to do things that are challenging and unique. As you can see my squares are not even. But I know through time and more practice, I'll be able to master it. I'll post the finished pillow case soon. I'm still struggling in sewing the squares to an old jacket that I cut to make the other side of the pillow case....


TBP3:: Hat
To be honest, I had a hard time making this one. I actually unraveled the stitches several times just so I can get to the size that will fit my head. But I struggled, until I just finally decided to let it go. When I can already buy the yarn as stated on the pattern that I'm following, then I guess I can be able to make nicer hat. The tutorial for the flower I got from attic24. The flower is easy to make and the button I got from an old blouse.


TBP4::Coin Purse
From this project I learned how to make shell stitches and a cute little button flower. The 2 shell stitches I used for this project are the Basic Shell Pattern and Shell Pattern 1 from the Lion Brand website. When I already finished the part for the body, I was faced with a small problem: how to join the sides together. I don't want the purse to be flat. I want it to be slightly bulky and has enough room for small bills and coins. So I decided to make shell stitches for the sides. The result was awesome! :) The idea for the little pink button flower also came from atti24. It was supposed to be a Japanese quince flower, but because I was using a thread yarn, I got a difficulty holding it, so I just decided to finish stitching the curled petals and drop the adding of a little yellow yarn in the center. Then I sewed it to the purse and the result was still amusing...Here it is...

front part of purse, with the little pink button flower nicely holding the 
overlap to the body of the purse; i used the Shell Stitch 1 for the overlap

back part; notice the Basic Shell Stitches I used for the purse

side part; i used shell stitches to join the sides of the body of the purse 
that gave more room for coins and bills

I don't have a picture for the scarf yet. It's still on progress. But I hope the result will also be a joy. Well, 'til next time.... (>‿◠)✌
♥♥♥♥♥

Wednesday, November 20, 2013

Organizing Rooms

I was searching for more crochet patterns and ideas today. It finally dawned on me what I would be concentrating for my future projects:: openwork and laces. Although there are a lot of projects already created for this on the internet, it still caught my interest and imaginative mind. The MyPicot website offers a lot of free patterns that I know can help me accomplish what I have in mind.

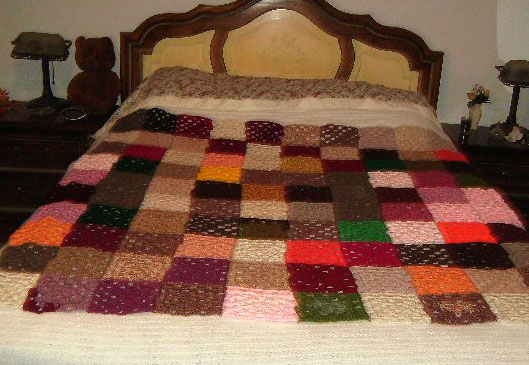
For openwork and laces one can create different styles and patterns from home decor to fashion. I think I'd concentrate more on creating scarfs and accessories. I did a little research on where to buy components for creating accessories and found a place near my area. I'm also planning to create these projects using thread yarns. Most of the patterns that I see always uses the usual yarn for crocheting or knitting. I will try to experiment using thread yarn for my projects.

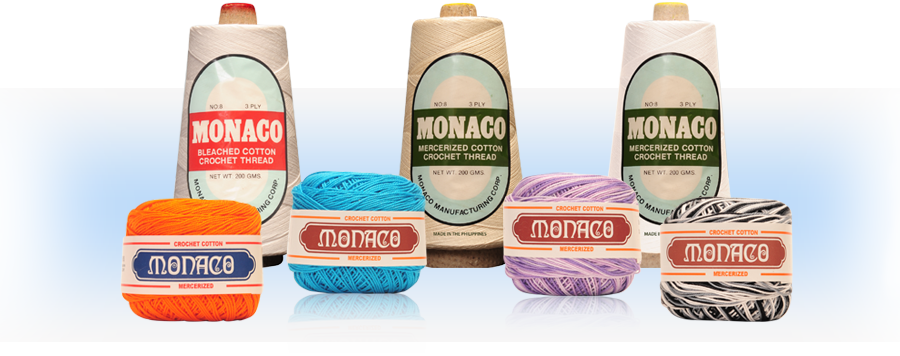
I'm now on the stage of organizing my backpack for the journey in Crochet World since it's now getting heavier and heavier as I discover more about it. Having the knowledge to what kind of project I would specifically want to create also gave me the knowledge on what kind of materials and tools I will be using. Right now I'm using Monaco yarn thread or crochet thread and a steel hook.

image from:: www.monaco.com.ph


I learned that yarn hooks are different from steel hooks. The steel hooks or thread hooks are the ones used for crocheting yarn threads. Yarn hooks are designed for yarns. Vogueknitting provides the detailed knowledge about hooks and sizes.

Yarns have their own story. I might fill an entire blog talking only about yarns. There are so much to learn about yarns. The experience would be like stepping into a botanical garden, filled with colors and vibrant. For kids, it would be like entering a room filled with different kind of candies and chocolates! There are different fiber types but usually they are classified by their weights. Vogueknitting provides more detailed information about yarns.

Learning how to the read a pattern or a chart is I think one of the most challenging phase in my journey. I was hesitant and a little intimidated at first. To be able to read a pattern you must first to learn the basics. (Of course!) When you already know the basic stitches next thing is you have to learn the abbreviations and terms. Most patterns use crochet abbreviations so educating yourself about it is relevant. There are usually two kinds of crochet terms used by crocheters: the British term and the American term. I usually check this first when I read a pattern. The term used determines what type of stitch you are going to use. Mypicot provides a clear explanation about this topic.

Here is an example of a simple pattern from Favecrafts:: Baby Blue Hat
Materials:
  • Lion Brand Cotton Ease, 50% cotton, 50% acrylic, 1 skein (207 yards/188 m), Lake#110 or a medium-weight (no.4) worsted-weight yarn
  • Size of hook: G/6/4.0mm crochet hook
Gauge: 1 inch = about 4 sts and 3 rnds; finished hat measures about 17 1/2 inches in circumference.

Instructions:
Body of Hat:
Rnd 1 (RS): Ch3, 10hdcs in 3rd chain from hook, join, do not turn.
Rnd 2: Ch2, [2 hdcs in next st, 1 hdc in next st] 5 times, join to top of 1st hdc (15 sts).
Rnd 3: Ch2, 1 hdc in same st, [2 hdcs in next st, 1 hdc in next 2 sts] 5 times, join to top of 1st hdc (21 sts).
.....and so on....(read the entire pattern here).

Materials:
  • Lion Brand Cotton Ease, 50% cotton, 50% acrylic yarn, 1 skein (207 yds/188 m)
    (shown here, Lake # 110) or a medium-weight (no. 4) worsted-weight yarn
  • Size G/6/4.0mm crochet hook

GAUGE: 1 inch = about 4 sts and 3 rnds; finished hat measures about 17 1/2 inches in circumference.

Instructions:
BODY OF HAT:
Rnd 1 (RS): Ch 3, 10 hdcs in 3rd ch from hook, join, do not turn.
Rnd 2: Ch 2, [2 hdcs in next st, 1 hdc in next st] 5 times, join to top of 1st hdc (15sts).
Rnd 3: Ch 2, 1 hdc in same st, [2 hdcs in next st, 1 hdc in next 2 sts] 5 times, join to top of 1st hdc (21 sts).
Rnd 4: Ch 2, 2 hdcs in same st, 1 hdc in next st, [2 hdcs in next st, 1 hdc in next st] 9 times, 2 hdcs in last st, join to top of 1st hdc (32 sts).
Rnd 5: Ch 2, 2 hdcs in same st, 1 hdc in next st, [2 hdcs in next st, 1 hdc in next 2 sts], 10 times, join to top of 1st hdc (44 sts).
Rnd 6: Ch 2, [2 hdcs in next st, 1 hdc in next 3 sts] 11 times, join to top of 1st hdc (55 sts).
Rnd 7: Ch 2, 1 hdc in next st and each st around, join to top of 1st hdc (55 sts).
Rnds 8 and 9: Repeat rnd 7.
Rnd 10: Ch 2, 1 hdc in next st and each st around, skip last st, join to top of 1st hdc (54 sts).
Rnds 11 through 14: Repeat rnd 10.
EDGING:
Rnd 1: [Ch 2, 1 dc and 1 sc in next st, sl st into next st] all the way around (27 "spikes" around), fasten off.

Read more at http://www.favecrafts.com/Crochet-for-Baby/Baby-Blue-Hat/ct/1#UkLzq1GQ5zJvTHjM.99
Another challenging phase in crocheting is the reading of a diagram or a chart. The rate on my knowledge about this is 4. I still have a lot to learn. A chart for a certain motif or a simple and textured pattern is easier to read. One time I tested my knowledge by reading a chart on a simple hat pattern. From there I learned the basics. I kind of freak out once I see charts for tops like bolero or lace jacket. There are also other charts that uses hard-won and elaborate symbols. I will learn all of these as I continue my journey on crocheting. You can learn about crochet symbols and how to follow a diagram via the Mypicot website. The website provides a clear and understandable guide on how to make stitches while familiarizing yourself with the terms and symbols. There are also other blogs and websites that show images and pictures on how to do the stitches. Youtube is also a very good resource to learn the basics of crocheting. You can also check the Lionbrand website for tutorials. They provide videos and illustrated instructions that are easier to follow and understand.

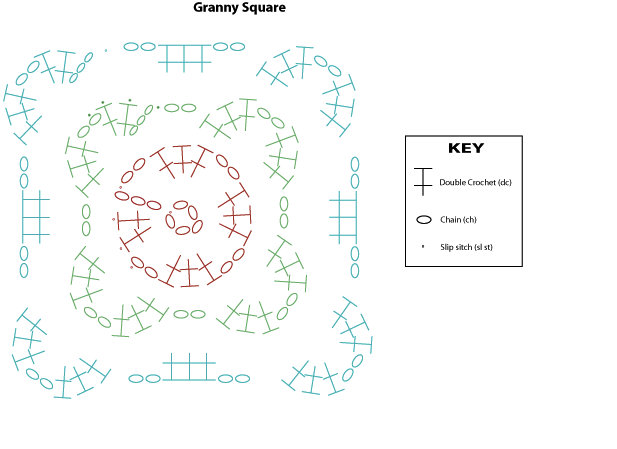
Here is an example of a granny square chart/diagram:
 
                                                  image from:: www.thehookandi.com

Another important thing to consider is the tension. This is one of my struggles while learning how to crochet. It's so hard to make even stitches! I thought that maybe I was pulling the yarn too tight or I'm not holding the hook correctly. I was relieved when I learned that I am not alone (sigh). I learned that it's a common problem of all crochet beginners.This blog post informed me a lot about tension.


Another thing that I think I should be reading more about is gauge. Every time that I encounter the word 'gauge' or even seeing it in a pattern, panic starts to boil inside me. A post from Crochet With Passion pointed out that gauging is very important and shouldn't be overlooked by anyone who is learning to crochet. And so my next challenge is to educate my self more about gauging.

It didn't took me an overnight to learn all of these things. They said that practice makes perfect. Well, I guess that if you are following a perfect system then the result of your practice will be perfect. But a baby didn't started from running too. First he has to learn to stand up by himself and have the courage to take that first step.

So.....Now that my baggage is organized I guess I have more room for new discoveries.....
♥♥♥♥♥

Tuesday, November 19, 2013

Arranging my Backpack

So...I found a great amount of time today to research more about my companions in my journey in crochet world and making the most out of it. I will try to create separate blogs for each item in my list since each one covers a lot of topics and issues. The companions I'm mentioning here are the list of things I need to consider while making my way in the Crochet World. (See my post about this topic here) On this post I will share some of the readings and the things I learned on how to make the most out of crocheting.

I felt that this new found passion gives me inspiration and hope in life that I could do things that I thought I couldn't do before. Crocheting became my outlet of my feelings and imagination. Whenever I make a stitch, a memory or thought or an idea crosses my mind. This helps me balance how I feel or think about something. I was inspired. And then as I research more about this craft, I learned that I can create a business out of it. I was more inspired. This is a good thing since I have always desired to make money out of my passion. As I researched more, I found some helpful blogs that encouraged me on how to make this dream come true and how to keep that fire burning in my heart. It's a reality for me that I can't make a lot of money from crafting and that the potential of making this a full-time business is low. This post of Stacey from Fresh Stitches gave me insights on why I should and shouldn't consider making this craft a possible business opportunity.....

To be able to start a craft business or crochet business would be a daunting task for me. But I know in my heart that I'm up for the challenge. So I listed the issues that I think I will be encountering on this journey. I based the list on the blog that I mentioned above::

❧ My niche:: The more I researched about crochet and other crafts and the more blogs I read about craft business, the more I felt that I'm becoming a lost soul in the Crochet World. But the only thing that every crochetizens have in common in this 'world' is their individuality and originality. And so I realized that I have to know my niche, where am I good at and how can I improve it. A lot of things are popping in my mind but I have to consider only one first and then from that, expand.

❧ Time:: Right now I have all the time in the world to concentrate on the journey and where I'm heading. I wouldn't be able to do all these-blogging, researching, crocheting- in just a week if I'm doing something else. Today I learned how to set a price for a product. Just doing all those math and calculations gives me headache. But in the end, I felt a sense of fulfillment. The craftybase post gave me an insight on how to set a price for handmade products and a post from stitchcraftcreate helped me uplift my value on what I do and why I do it.

❧ Loving what I like:: To be honest, I'm in love with all kinds of crafts. But since I'm now in Crochet World and enjoying every step I'm taking, I should first concentrate on what I think I should be spending more time with. Just like having a stick in your hand while traversing a path on a hill. I like scarfs. And I think I will love em more. I have seen a lot of different scarfs and styles, crocheted or knitted. But no scarf is the same. Each one is unique and speaks for itself and its creator. I have also checked the various prices that websites like Etsy offers. I think that scarf business is a large market even online so it would be a challenge for me if I would consider this area to be my 'stick' as I take that path.

❧ My Audience:: Right now I will just use the available social networking sites that provide free venues for advertisement. To have my own website for an etsy shop is still far on my list. In our country we have this saying: "While the blanket is short, bear with it for a while." So I'll just use what's available but can still be valuable.

❧ Extra Skills:: Photography is one of those things that I think would be still far from my list. Right now I only got my phone's camera to take pictures of projects that I made. A true camera though would require some luxury and my wallet can't provide for that. But in the near future I know I'll have one. Hopefully. ☺ I think I have an edge on this, I just don't have the right tool. But if someone is Santa enough, I'll be so grateful. :D Here are some pictures that I took with my old phone:

 I think that when this craft business become successful, I'd be able to purchase a new phone that will make great shots. (>‿◠)✌

My backpack for the journey is full. But I think I have everything I need.....
♥♥♥♥♥