I was searching for more crochet patterns and ideas today. It finally dawned on me what I would be concentrating for my future projects:: openwork and laces. Although there are a lot of projects already created for this on the internet, it still caught my interest and imaginative mind. The
MyPicot website offers a lot of free patterns that I know can help me accomplish what I have in mind.
For openwork and laces one can create different styles and patterns from home decor to fashion. I think I'd concentrate more on creating scarfs and accessories. I did a little research on where to buy components for creating accessories and found a place near my area. I'm also planning to create these projects using thread yarns. Most of the patterns that I see always uses the usual yarn for crocheting or knitting. I will try to experiment using thread yarn for my projects.
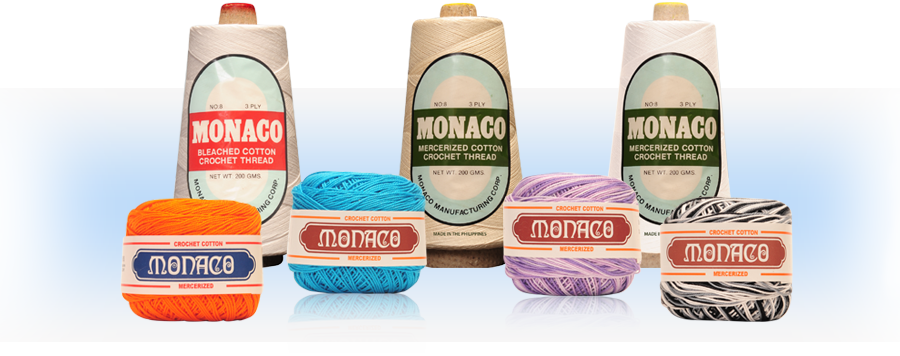
I'm now on the stage of organizing my backpack for the journey in Crochet World since it's now getting heavier and heavier as I discover more about it. Having the knowledge to what kind of project I would specifically want to create also gave me the knowledge on what kind of materials and tools I will be using. Right now I'm using Monaco yarn thread or crochet thread and a steel hook.
image from:: www.monaco.com.ph
I learned that yarn hooks are different from steel hooks. The steel hooks or thread hooks are the ones used for crocheting yarn threads. Yarn hooks are designed for yarns.
Vogueknitting provides the detailed knowledge about hooks and sizes.
Yarns have their own story. I might fill an entire blog talking only about yarns. There are so much to learn about yarns. The experience would be like stepping into a botanical garden, filled with colors and vibrant. For kids, it would be like entering a room filled with different kind of candies and chocolates! There are different fiber types but usually they are classified by their weights.
Vogueknitting provides more detailed information about yarns.
Learning how to the read a pattern or a chart is I think one of the most challenging phase in my journey. I was hesitant and a little intimidated at first. To be able to read a pattern you must first to learn the basics. (Of course!) When you already know the basic stitches next thing is you have to learn the abbreviations and terms. Most patterns use crochet abbreviations so educating yourself about it is relevant. There are usually two kinds of crochet terms used by crocheters: the British term and the American term. I usually check this first when I read a pattern. The term used determines what type of stitch you are going to use.
Mypicot provides a clear explanation about this topic.
Here is an example of a simple pattern from
Favecrafts:: Baby Blue Hat
Materials:
- Lion Brand Cotton Ease, 50% cotton, 50% acrylic, 1 skein (207 yards/188 m), Lake#110 or a medium-weight (no.4) worsted-weight yarn
- Size of hook: G/6/4.0mm crochet hook
Gauge: 1 inch = about 4 sts and 3 rnds; finished hat measures about 17 1/2 inches in circumference.
Instructions:
Body of Hat:
Rnd 1 (RS): Ch3, 10hdcs in 3rd chain from hook, join, do not turn.
Rnd 2: Ch2, [2 hdcs in next st, 1 hdc in next st] 5 times, join to top of 1st hdc (15 sts).
Rnd 3: Ch2, 1 hdc in same st, [2 hdcs in next st, 1 hdc in next 2 sts] 5 times, join to top of 1st hdc (21 sts).
.....and so on....(read the entire
pattern here).
Materials:
- Lion Brand Cotton Ease, 50% cotton, 50% acrylic yarn, 1 skein (207 yds/188 m)
(shown here, Lake # 110) or a medium-weight (no. 4) worsted-weight yarn
- Size G/6/4.0mm crochet hook
GAUGE: 1 inch = about 4 sts and 3 rnds; finished hat measures about 17 1/2 inches in circumference.
Instructions:
BODY OF HAT:
Rnd 1 (RS): Ch 3, 10 hdcs in 3rd ch from hook, join, do not turn.
Rnd 2: Ch 2, [2 hdcs in next st, 1 hdc in next st] 5 times, join to top of 1st hdc (15sts).
Rnd 3: Ch 2, 1 hdc in same st, [2 hdcs in next st, 1 hdc in next 2 sts] 5 times, join to top of 1st hdc (21 sts).
Rnd 4: Ch 2, 2 hdcs in same st, 1 hdc in next st, [2 hdcs in next st, 1 hdc in next st] 9 times, 2 hdcs in last st, join to top of 1st hdc (32 sts).
Rnd 5: Ch 2, 2 hdcs in same st, 1 hdc in next st, [2 hdcs in next st, 1 hdc in next 2 sts], 10 times, join to top of 1st hdc (44 sts).
Rnd 6: Ch 2, [2 hdcs in next st, 1 hdc in next 3 sts] 11 times, join to top of 1st hdc (55 sts).
Rnd 7: Ch 2, 1 hdc in next st and each st around, join to top of 1st hdc (55 sts).
Rnds 8 and 9: Repeat rnd 7.
Rnd 10: Ch 2, 1 hdc in next st and each st around, skip last st, join to top of 1st hdc (54 sts).
Rnds 11 through 14: Repeat rnd 10.
EDGING:
Rnd 1: [Ch 2, 1 dc and 1 sc in next st, sl st into next st] all the way around (27 "spikes" around), fasten off.
Read more at
http://www.favecrafts.com/Crochet-for-Baby/Baby-Blue-Hat/ct/1#UkLzq1GQ5zJvTHjM.99 Materials:
- Lion Brand Cotton Ease, 50% cotton, 50% acrylic yarn, 1 skein (207 yds/188 m)
(shown here, Lake # 110) or a medium-weight (no. 4) worsted-weight yarn
- Size G/6/4.0mm crochet hook
GAUGE: 1 inch = about 4 sts and 3 rnds; finished hat measures about 17 1/2 inches in circumference.
Instructions:
BODY OF HAT:
Rnd 1 (RS): Ch 3, 10 hdcs in 3rd ch from hook, join, do not turn.
Rnd 2: Ch 2, [2 hdcs in next st, 1 hdc in next st] 5 times, join to top of 1st hdc (15sts).
Rnd 3: Ch 2, 1 hdc in same st, [2 hdcs in next st, 1 hdc in next 2 sts] 5 times, join to top of 1st hdc (21 sts).
Rnd 4: Ch 2, 2 hdcs in same st, 1 hdc in next st, [2 hdcs in next st, 1 hdc in next st] 9 times, 2 hdcs in last st, join to top of 1st hdc (32 sts).
Rnd 5: Ch 2, 2 hdcs in same st, 1 hdc in next st, [2 hdcs in next st, 1 hdc in next 2 sts], 10 times, join to top of 1st hdc (44 sts).
Rnd 6: Ch 2, [2 hdcs in next st, 1 hdc in next 3 sts] 11 times, join to top of 1st hdc (55 sts).
Rnd 7: Ch 2, 1 hdc in next st and each st around, join to top of 1st hdc (55 sts).
Rnds 8 and 9: Repeat rnd 7.
Rnd 10: Ch 2, 1 hdc in next st and each st around, skip last st, join to top of 1st hdc (54 sts).
Rnds 11 through 14: Repeat rnd 10.
EDGING:
Rnd 1: [Ch 2, 1 dc and 1 sc in next st, sl st into next st] all the way around (27 "spikes" around), fasten off.
Read more at
http://www.favecrafts.com/Crochet-for-Baby/Baby-Blue-Hat/ct/1#UkLzq1GQ5zJvTHjM.99 Another challenging phase in crocheting is the reading of a diagram or a chart. The rate on my knowledge about this is 4. I still have a lot to learn. A chart for a certain motif or a simple and textured pattern is easier to read. One time I tested my knowledge by reading a chart on a simple hat pattern. From there I learned the basics. I kind of freak out once I see charts for tops like bolero or lace jacket. There are also other charts that uses hard-won and elaborate symbols. I will learn all of these as I continue my journey on crocheting. You can learn about
crochet symbols and
how to follow a diagram via the
Mypicot website. The website provides a clear and understandable guide on how to make stitches while familiarizing yourself with the terms and symbols. There are also other blogs and websites that show images and pictures on how to do the stitches.
Youtube is also a very good resource to learn the basics of crocheting. You can also check the
Lionbrand website for tutorials. They provide videos and illustrated instructions that are easier to follow and understand.
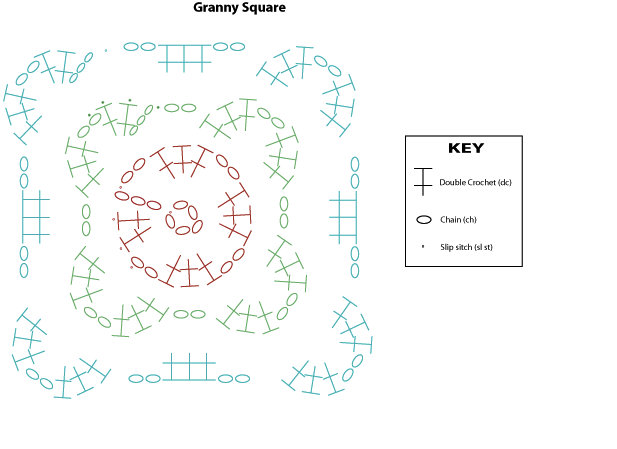
Here is an example of a granny square chart/diagram:
Another important thing to consider is the tension. This is one of my struggles while learning how to crochet. It's so hard to make even stitches! I thought that maybe I was pulling the yarn too tight or I'm not holding the hook correctly. I was relieved when I learned that I am not alone (sigh). I learned that it's a common problem of all crochet beginners.This
blog post informed me a lot about tension.
Another thing that I think I should be reading more about is gauge. Every time that I encounter the word 'gauge' or even seeing it in a pattern, panic starts to boil inside me. A post from
Crochet With Passion pointed out that gauging is very important and shouldn't be overlooked by anyone who is learning to crochet. And so my next challenge is to educate my self more about gauging.
It didn't took me an overnight to learn all of these things. They said that practice makes perfect. Well, I guess that if you are following a perfect system then the result of your practice will be perfect. But a baby didn't started from running too. First he has to learn to stand up by himself and have the courage to take that first step.
So.....Now that my baggage is organized I guess I have more room for new discoveries.....
♥♥♥♥♥



.png)